Free Crochet Pattern for Ribbed Scarf
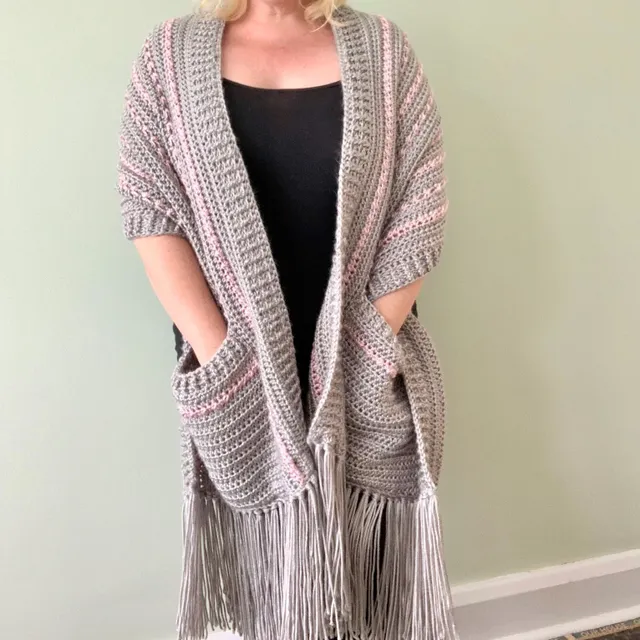
This free crochet pattern to make a stripy, ribbed crochet scarf, is so easy to follow, it’s perfect for absolute beginners to crochet and perfect for gift giving! The video tutorial will show you how to make this easy crochet scarf using bulky or chunky yarn – plus there are no ends to weave in with the colour changes as they are used in the fringe!

Ribbed Crochet Scarf | Free Crochet Patterns
There is just something comforting about wrapping a soft, cosy scarf around your neck before heading out for a stroll; and with this stripped, ribbed crochet scarf, you can create personalised gifts which feature the gift receivers favourite colours! This free crochet pattern will help you create the perfect, personalised handmade gift.
Simply choose your 3 favourite colours of bulky or chunky yarn (if your making for you)and grab your 6mm crochet hook and lets get started! The yarn I recommend for this free crochet pattern is PaintBox Yarns Simply Chunky – click here to see all 50 shades you can choose from. There are so many different shades choose from and it’s also machine washable!
Please note that some of the links in my blog are affiliate links. I may earn a small commission if you purchase via this links, but the price you pay is not affected
Purchase the Ad-Free Printable PDF Pattern
You can download your ad-free printable PDF copy of the Easy Ribbed Beanie Crochet Pattern from my Etsy Shop or Ravelry Shop.

Skill Level: Beginner
Materials:
- 3 balls of PaintBox Yarns Simply Chunky (100g/136m) in as many shades as you like!
- I used the following 5 shades:
- Blush Pink (353)
- Ballet Pink (352)
- Champagne White (302)
- Dusty Lilac (346)
- Pale Lilac (345)
- 6mm Crochet hook
- Tapestry needle
- Scissors
Click here to purchase your yarns (affiliate link)
Gauge: 10 stitches and 2 rows = 4in (10cm) over HTr using 6cmm crochet hook. Use a larger or smaller crochet hook to obtain the correct tension.
Finished Size:
200cm long and 18cm wide
Stitch Abbreviations: UK Terms (US terms in brackets)
St(s) Stitches
Ch Chain
BLO work into the back loop of the stitch
HTr (HDc) Half Treble Crochet (Half Double Crochet)
On Wednesday 4th November 2020, this pattern was featured in the Season of Joy, part of the 30 Days of Giving – Quick Patterns for the Holidays blog hop from Ambassador Crochet. Click here to see all the other featured patterns.
Special Stitches:
Half Treble Crochet (HTr)
- Yarn over hook.
- Insert hook into stitch.
- Yarn over and draw up a loop. (3 loops on hook)
- Yarn over and pull through all 3 loops.
Pattern Notes:
- Whatever your skill level with crochet, I would always recommend reading through this pattern before beginning. Get in touch if you need any help completing the pattern.
- This pattern is worked in rows.
- Ch at the beginning of the rows do not count as a stitch.
- Do not weave in ends when changing colours – we will use them for the fringe.
How to Crochet This Easy Ribbed Scarf
With shade Blush Pink,
Ch 202.
Row 1: HTr in 3rd ch from hook and each chain across. Turn. (200)
Row 2: Ch2 (does not count as a st). In BLO, HTr in same st as Ch2 and in each st across. Turn. (200)
Change to Pale Lilac
Rows 3 & 4: Repeat Row 2.
Change to Dusty Lilac
Rows 5 & 6: Repeat Row 2.
Change to Champagne White
Rows 7 & 8: Repeat Row 2.
Change to Blush Pink
Rows 9 & 10: Repeat Row 2.
Change to Ballet Pink
Rows 11 & 12: Repeat Row 2.
Change to Dusty Lilac
Rows 13 & 14: Repeat Row 2.
Change to Champagne White
Rows 15 & 16: Repeat Row 2.
Fasten off and move on to add a fringe.

Add the fringe
Cut 30cm lengths of each of the colours:
Blush Pink x 24
Ballet Pink x 12
Champagne White x 24
Dusty Lilac x 24
Pale Lilac x 12
Pro Tip
Use a hardbound book to wrap the yarn around before cutting so all the lengths are the same without measuring.

Secure the loose ends by tying the matching colours in a knot.
- Insert the hook into the centre of the 2 rows of the same colour
- using 6 strands of the matching colour, bring the strands through the row to create a loop
- remove the hook
- bring the ends of the strands through the loop along with the tail ends from the colour changes
- pull gently to secure the fringe
Repeat across both of the shorter edges of the scarf until all the fringe has been added.
PRO TIP:
Use a handheld steamer to help straighten your fringe prior to trimming – the light steam makes your fringe sleek and even. Just make sure that your yarn is suitable for steaming – I safely steam Paintbox Yarns Simply Chunky on my scarf.
The hand held steamer I use and recommend is Tefal DR8085 Access Steam Handheld Garment Steamer – click here to view and purchase.
(Affiliate link – it wont change the price you pay but I may earn a small commission if you purchase)

I’d love to see your completed Easy Ribbed Scarf, so don’t forget to tag me in a photo on your social media @cosyrosieuk