Blanket Stitch Edging for Blankets
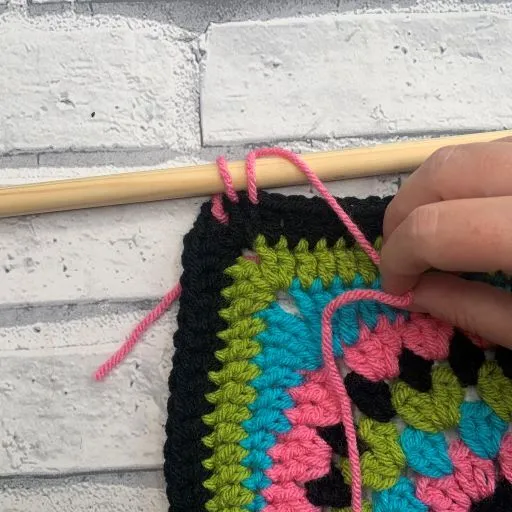
The final step to completing any granny square blanket is adding an edging. This granny square edging creates the look of the traditional blanket stitch.

Please note that some of the links in my blog are affiliate links. I may earn a small commission if you purchase via these links, but the price you pay is not affected
Blanket Stitch Edging for Granny Squares | Free Crochet Pattern
The edging used on the Hodgepodge Blanket creates the look of a traditional blanket stitch which is worked in 2 different colours to create the contrast required to showcase the stitch to it’s best.
This edging is completed in 3 quick rounds of crochet stitches using all 3 of the basic stitches in the rounds.
You can make the edging your own by working additional rounds of the Round 2 to create more depth of the edging before working the final round, placing the blanket stitch element.
Read on to discover 5 other types of blanket edging you might like to work around your finished granny square blanket.
Purchase the Printable Pattern
You can purchase a printable copy of the full Hodgepodge Blanket – simply click the button below to purchase.

5 Alternative edging options for your Granny Square Blanket
Choosing an alternative edging on for your granny square blanket can create a different finished look.
Click Here to see 5 Easy Borders for Granny Squares incuding:
- Double Crochet Edging
- V-Stitch Edging
- Crab Stitch (Reverse Sc border)
- Shell Stitch Crochet Edging – pictured below
Each of these borders for granny squares are quick and easy to complete and only use 1 round to be completed, however, I’d recommend completing Round 1 of the Blanket Stitch edging to create a solid foundation to work on.

Blanket Stitch Border for Granny Square Blanket
Abbreviations
US Terms (UK terms in brackets)
St(s) – Stitch(es)
Ch – Chain
Sc (Dc) – Single Crochet (Double Crochet
HDc (HTr) – Half Double (Treble) Crochet
Dc ( Tr) – Double Crochet (Treble Crochet)
Skill level: Beginner
Materials:
- Aran/worsted weight yarn
- I used used 100m PaintBox Simply Aran 100% Acrylic yarn in the following 2 shades:
- Stormy Grey (203)
- Bubblegum Pink (250)
- 5mm Crochet Hook
- Scissors
- Tapestry needle
Gauge:
- gauge not essential – Use a larger or smaller crochet hook to obtain the correct finished square size.

How to crochet the Blanket Stitch Border
Pattern Notes:
- Please read through the entire pattern before beginning, regardless of skill level. Please contact me ([email protected]) if help is needed to understand any part of pattern.
- Working your 3rd round in a contrasting colour will make the stitches stand out more.
- Beginning ch-1 DOES NOT count as st.
Round 1: Join A in any corner, ch 1, (2 sc, ch 2, 2 sc) in same, sc in each across placing 1 sc in each st and border join to next corner (skip last if your number of stitches is not even), *(2 sc, ch 2, 2 sc) in corner, sc in each across placing 1 sc in each st and border join to next corner; repeat from * around to end, sl st to 1 st to join.

Round 2: Sl st loosely to next ch-2 sp, ch 1 (does not count as st), (2 hdc, ch 2, 2 hdc) in same, hdc in each across to next corner, *(2 hdc, ch 2, 2 hdc) in corner, hdc in each across to next corner; repeat from * around to end, sl st to 1 st to join.
Round 3: Join B in any ch-2 sp, ch 1, (2 sc ch 2, 2 sc) in same, *skip 1, dc in sc 2 rows below skipped, sc in next of current round; repeat from * across to next corner, [(2 sc, ch 2, 2 sc) in next corner, *skip 1, dc in sc 2 rounds below skipped, sc in next of current round; repeat from * across to next corner] 3 times, sl st to 1 st st to join.
Fasten off and weave in ends.
Hodgepodge Granny Square Blanket CAL
A huge thank you to everyone who has taken part in this event – it has been an absolute pleasure hosting this event from start to finish.
A huge thank you to my pattern testers and editor who kindly helped test all 30 of the square designs to check for accuracy in this pattern – it’s always such a pleasure to see a pattern come to life.

